In the app: folder (media manager) RAW recording Convert
The converter turns a RAW ZIP or .mcpro recording into a regular video or a folder of CinemaDNG frames, right on the phone. It needs Android 9 or later and a 64-bit phone with OpenGL ES 3.1.
There are three ways to open the Converter panel:
- the Convert button in the RAW player;
- the "convert" button next to a RAW recording in the media manager;
- selecting several recordings in the media manager (long press) and using the same button at the bottom. Each recording is converted separately with the same settings; the panel shows the settings for the first one.
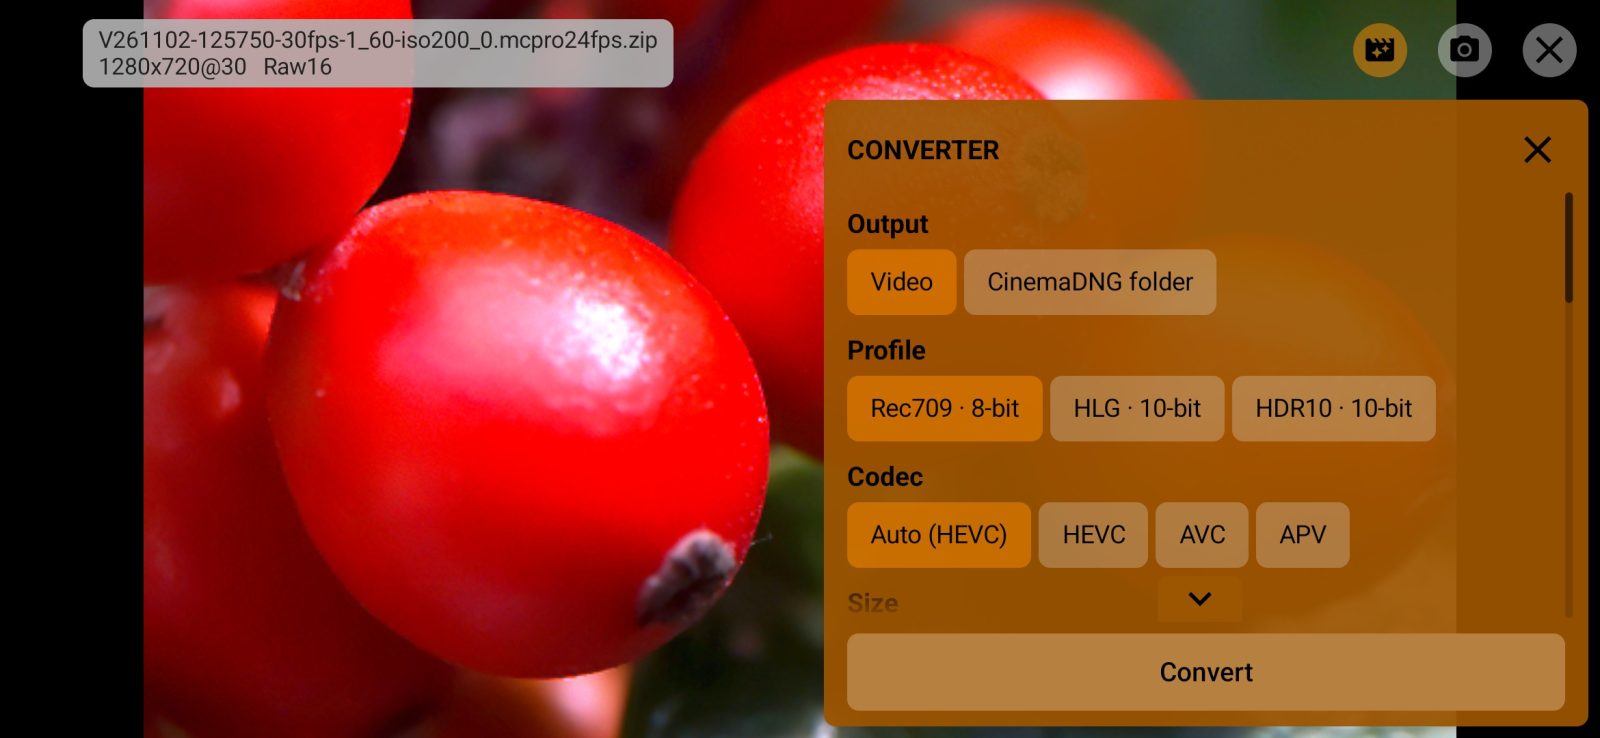
Every choice is remembered for next time. The Convert button at the bottom of the panel puts the recording in the queue; what happens next is described in Conversion progress.
What the video takes from the player
When the converter is opened from the player, the video gets the exposure, white balance, LUT and distortion correction exactly as they are on screen. When it is opened from the media manager, it uses the exposure, LUT and distortion the player last remembered, and white balance as shot.
A CinemaDNG folder does not get these settings: it holds the original frames.
1Output
Video or CinemaDNG folder. For a CinemaDNG folder only the Folder row stays in the panel: the DNG frames are saved as they are, with the sound in a WAV file and the gyro files next to them. Dropped frames are filled with a repeat of the previous frame, so the sequence has no gaps. Default: Video.
The rest of the rows apply to video only.
2Profile
Rec709 · 8-bit, HLG · 10-bit or HDR10 · 10-bit. Rec709 is regular video that any screen can show. HLG and HDR10 are high dynamic range video for HDR screens and are written in 10 bits. HDR10 files also carry brightness information measured from the frames.
HLG and HDR10 need a 10-bit hardware encoder. If the phone doesn't have one, the conversion stops with an error instead of quietly producing Rec709. Until you pick a profile here for the first time, the converter uses the screen profile from the player.
3Codec
Auto, HEVC, AVC, AV1 or APV. Only codecs the phone has a hardware encoder for, suitable for the profile and the size of this recording, are listed. AVC writes Rec709 only. AV1 needs Android 10 or later, APV Android 16 or later; APV always writes 10-bit 4:2:2, Rec709 included.
Auto takes the first one available: for Rec709 HEVC, AVC, AV1, APV; for HLG and HDR10 HEVC, AV1, APV. The codec it picked is shown in brackets. While the app is checking the phone's encoders, the row says Checking the phone's encoders… and the Convert button is unavailable. Default: Auto.
Size
Options: original, 2160p or 1080p. 2160p fits the frame into 3840×2160 and 1080p into 1920×1080, keeping the proportions; each option shows the resulting size. The converter doesn't upscale, so if the recording is smaller than 3840×2160, the 2160p option is not shown. An option is also missing when the encoder doesn't accept that size. Default: original.
Some encoders only accept a width that is a multiple of their step. Then the frame is cropped at the center, and a note with the resulting size appears under the row.
Frame rate
For information only: the video always keeps the recording's frame rate.
Frame timing
How frames are placed in time when the recording has dropped frames:
- As shot: each frame sits where the sensor captured it. Where a frame was dropped, the previous one stays on screen longer, and the sound stays in sync with the picture.
- Frame-rate grid: an even frame rate, with dropped frames filled by a repeat of the previous one. On long clips the sound may drift slightly.
- Ignore dropped: frames back to back, with no repeats or gaps. The video gets shorter by the dropped frames, and the sound drifts from the picture by the same amount.
The note under the row says what the chosen option means for the sound. A frame that could not be read from the archive counts as dropped. Default: As shot.
Bitrate
The video data rate: 20 to 200 Mbit/s for HEVC, AVC and AV1, 100 to 600 Mbit/s for APV. Values the phone's encoder doesn't support are hidden. The value is remembered separately for each codec. Default: 50 Mbit/s, 200 Mbit/s for APV.
Debayer
How the sensor mosaic becomes a color frame:
- MHC: fast and sharp, fine almost always.
- AHD: cleaner on fine detail and colored edges, slower.
- AHD + color noise reduction: AHD plus color noise reduction, the slowest. For dark, noisy footage.
- Bilinear: the simplest. Fine detail is softer, but it leaves the fewest color fringes on sharp edges of saturated colors.
Default: MHC.
Downscale filter
Shown only when the size is smaller than the original. How the frame is scaled down:
- Softer: averages neighboring pixels. A softer picture without light or dark halos along edges.
- Sharper: a Catmull-Rom filter that keeps more fine detail.
Default: Softer.
Container
MOV or MP4. They differ only in sound: MOV can keep it uncompressed (PCM), MP4 always uses AAC. Default: MOV.
Sound
The options depend on the sound recorded in the archive:
- WAV or PCM sound into MOV: As in the archive (PCM), AAC or No sound. If the sound is 32-bit float, there is also PCM 16-bit, which more programs can read.
- WAV or PCM sound into MP4: AAC (MP4 has no PCM) or No sound.
- AAC sound: As in the archive (AAC) (copied without re-encoding) or No sound.
If the archive has no sound, the row says No sound in the archive. In older slow-motion or speed-up recordings the sound was not adjusted to the picture, so they are converted without sound. Default: as in the archive.
AAC bitrate and AAC sample rate
Shown only when WAV sound is encoded to AAC. Bitrate from 96 to 320 kbit/s, 192 kbit/s by default. Sample rate: the first option is the recording's own rate (or the nearest lower one the AAC encoder supports), followed by lower ones.
Gyro data
Gyro data for stabilization in Gyroflow, if the recording has it (see Stabilizing in Gyroflow):
- GPMF: a gyro track inside the video and a lens profile file
.lensprofile.jsonnext to it. - gcsv: gyro data and lens profile as separate files next to the video, no track.
- Protobuf: gyro data and lens profile in a track inside the video.
- No gyro: no gyro data.
On Android 11 and later the files next to the video go into Download/<app folder>, because Android doesn't allow such files in DCIM. If the recording has no gyro data, the video is written without it. Default: GPMF.
Folder
Default, My folder or Choose folder…. By default the video goes where the app saves its recordings: DCIM/<app folder> (with a date subfolder if Add date to filepath is on), on the storage chosen in the app. The default CinemaDNG folder is Download/<app folder>/<recording name>.
There is one own folder for both video and CinemaDNG; a CinemaDNG folder is created inside it with the recording's name. If the app no longer has access to your folder, the file goes to the default folder. The note under the row says exactly where the file will be saved.
The video is named after the recording, the profile and a number: <recording name>-rec709_1.mov. If such a file already exists, the number goes up.